An acrylic box is one of the most versatile display and storage solutions used in retail stores, vape shops, cosmetic counters, electronics packaging, and even home organization. Because acrylic is lightweight, transparent, durable, and highly customizable, many people want to learn how to make an acrylic box for personal or commercial use.
Whether you are searching for how to build an acrylic box, researching how to make a plexiglass box, or planning a complete diy acrylic box project, this guide will walk you through every important step. We will also explain how to waterproof an acrylic box properly so it can be used for outdoor displays, humid environments, or dustproof product protection.
Many people also refer to acrylic as plexiglass or Perspex. That is why searches such as how to build plexiglass box, diy plexiglass box, plexiglass box diy, and how to make perspex box are all related to the same type of project.
In this article, you will learn:
- What materials are needed to make an acrylic box
- How to cut and assemble acrylic panels
- How to waterproof an acrylic box
- Common DIY mistakes to avoid
- Professional manufacturing tips
- When to choose custom production instead of DIY
If you want to successfully make acrylic box projects with a professional appearance, this complete guide will help you achieve better results.
What Is an Acrylic Box?
An acrylic box is a transparent enclosure made from acrylic sheets, also called plexiglass or Perspex. Compared with traditional glass, an acrylic box is lighter, safer, easier to fabricate, and more impact-resistant.
Today, acrylic box products are widely used for:


Because acrylic can be laser cut, UV printed, polished, bent, and glued, it is one of the most popular materials for custom fabrication.
People searching for a box in plexiglass usually want a transparent enclosure that combines aesthetics with durability. Acrylic is ideal for this purpose because it offers excellent transparency and can be waterproofed when assembled correctly.
Why Choose Acrylic Instead of Glass?
Before learning how to make acrylic box projects, it is important to understand why acrylic is preferred over traditional glass.
Lightweight
An acrylic box weighs much less than glass, making transportation and installation easier.
Better Impact Resistance
Acrylic is significantly more durable and less likely to shatter.
Easier Fabrication
Whether you want to learn how to build an acrylic box or create a simple diy plexiglass box, acrylic is easier to cut and assemble than glass.
High Transparency
Acrylic provides crystal-clear visibility, making an acrylic box ideal for retail displays.
Easy Waterproof Sealing
With proper adhesive and silicone sealing, an acrylic box can become highly waterproof and dustproof.
Materials Needed to Make an Acrylic Box
If you want to learn how to make an acrylic box successfully, choosing the right materials is critical.
Acrylic Sheets
The most important material for any acrylic box project is the acrylic sheet itself.
Recommended thickness:
| Application | Recommended Thickness |
|---|---|
| Small acrylic box | 3mm |
| Medium acrylic box | 5mm |
| Large waterproof acrylic box | 8mm–10mm |
Clear acrylic is the most common choice, but frosted, colored, and mirrored finishes are also available.
Acrylic Adhesive
Professional acrylic box fabrication usually uses:
Acrylic cement
UV adhesive
Solvent glu
These adhesives create strong and transparent joints.
Silicone Sealant
If you want a waterproof acrylic box, silicone sealant is essential.
It helps:
- Prevent water leakage
- Improve dust resistance
- Strengthen corner sealing
Additional Materials
Depending on your acrylic box design, you may also need:


Tools Required for DIY Acrylic Box Projects
To complete a professional diy acrylic box, prepare these tools:

Acrylic cutter

Laser cutter

Table saw

Drill machine

Clamps

Measuring tape

Sandpaper

Polishing cloth
Professional factories often use CNC machines and laser cutting systems to achieve seamless acrylic box production.
How to Make an Acrylic Box Step by Step
Now let's go through the full process of how to make an acrylic box.
Step 1 – Design Your Acrylic Box
Before cutting materials, decide:
Box dimensions
Acrylic thickness
Waterproof requirements
Lid type
Opening direction
Sketch the structure carefully.
If you are researching how to build plexiglass box projects for retail displays, make sure enough space is reserved for products and branding.
Good planning is essential for a successful acrylic box.
Step 2 – Measure and Cut the Acrylic Panels
The next step in how to build an acrylic box is cutting the panels accurately.
Typical acrylic box panels include:
Front panel
Back panel
Left side
Right side
Bottom panel
Top cover
You can cut acrylic using:
- Laser cutting
- CNC cutting
- Acrylic knife
- Table saw
Laser cutting is preferred because it creates smooth edges for an acrylic box.
When learning how to make a plexiglass box, precision is extremely important because uneven edges can cause leaks.
Step 3 – Polish the Acrylic Edges
After cutting, polish the edges before assembly.
This step improves:
- Transparency
- Bonding strength
- Waterproof performance
Professional acrylic box manufacturers often use flame polishing or diamond polishing for crystal-clear edges.
A polished acrylic box looks much more premium than rough DIY versions.
Step 4 – Assemble the Acrylic Box
This is the most important step in how to make acrylic box projects.
Place the panels carefully and use clamps to hold them in position.
Apply acrylic adhesive along the edges slowly.
Tips for better acrylic box assembly:
Avoid excess glue
Work on a flat surface
Keep dust away
Allow proper curing time
If you are trying a plexiglass box diy project for the first time, patience is critical.
Poor alignment may affect the waterproof performance of the acrylic box.
If you need retail-grade acrylic boxes with cleaner joints and professional waterproof sealing, our factory also supports custom acrylic box manufacturing for wholesale and OEM projects.
Step 5 – Waterproof the Acrylic Box
To create a waterproof acrylic box, apply silicone sealant along all internal seams.
Focus on:
- Bottom edges
- Corner joints
- Lid sealing areas
This step is what separates a decorative acrylic box from a waterproof acrylic box.
For outdoor use, choose waterproof industrial-grade silicone.
People searching how to make a plexiglass box often forget this step, which leads to leakage problems later.
Step 6 – Install the Lid or Door
Depending on your design, your acrylic box may include:


For retail and vape displays, lockable acrylic box designs are especially popular.
A properly sealed lid improves waterproof performance significantly.
Step 7 – Test the Waterproof Performance
Once your acrylic box is fully cured, test it carefully.
Methods include:
- Water spray testing
- Leak testing
- Humidity testing
If leakage appears, reapply silicone sealant.
A high-quality acrylic box should remain clear, stable, and waterproof after testing.
Common Mistakes When Making an Acrylic Box
Many beginners fail their first diy acrylic box because of avoidable mistakes.
- Using the Wrong Adhesive
Ordinary glue may fog the acrylic box or weaken the joints.
Always use acrylic-specific adhesive.
- Choosing Acrylic That Is Too Thin
Thin sheets may bend or crack.
A waterproof acrylic box usually requires thicker material.
- Poor Cutting Accuracy
Uneven cuts create gaps.
When learning how to build plexiglass box structures, precision matters.
- Ignoring Waterproof Sealing
Many diy plexiglass box tutorials online skip silicone sealing completely.
Without sealing, your acrylic box will not be waterproof.
- Rushing the Curing Process
Adhesive requires time to cure fully.
Moving the acrylic box too early can weaken the joints.
Best Acrylic Thickness for Different Acrylic Box Applications
Choosing the right thickness improves durability and waterproof performance.
| Acrylic Box Type | Thickness |
|---|---|
| Cosmetic acrylic box | 3mm |
| Retail display acrylic box | 5mm |
| Waterproof outdoor acrylic box | 8mm |
| Heavy-duty acrylic box | 10mm |
Thicker material gives an acrylic box a more premium appearance.
DIY Acrylic Box vs Professional Manufacturing
Although many people search for how to make perspex box or diy perspex box, large commercial projects usually require factory production.
Here is a comparison:
| DIY Acrylic Box | Factory-Made Acrylic Box |
|---|---|
| Suitable for small projects | Ideal for bulk orders |
| Lower initial cost | Better finish quality |
| Limited tools | CNC precision |
| Manual assembly | Automated production |
| Higher leak risk | Professional waterproof sealing |
If you need branded retail displays, professional acrylic box manufacturing is usually the better option.
Need retail-grade waterproof acrylic box solutions for your brand? Contact us for custom OEM/ODM acrylic display box manufacturing with logo printing, LED integration, and bulk wholesale support.
Professional Tips for Building a Waterproof Acrylic Box
Professional manufacturers use advanced techniques to improve acrylic box quality.
-
UV Bonding Technology
UV bonding creates nearly invisible joints.
This makes the acrylic box look cleaner and more premium.
- CNC Cutting
CNC systems improve precision and reduce assembly errors.
-
Flame Polishing
Flame polishing gives the acrylic box crystal-clear edges.
- Silicone Edge Reinforcement
Professional waterproof acrylic box production often uses double sealing methods.
- Structural Reinforcement
Large acrylic box designs may require internal support structures.
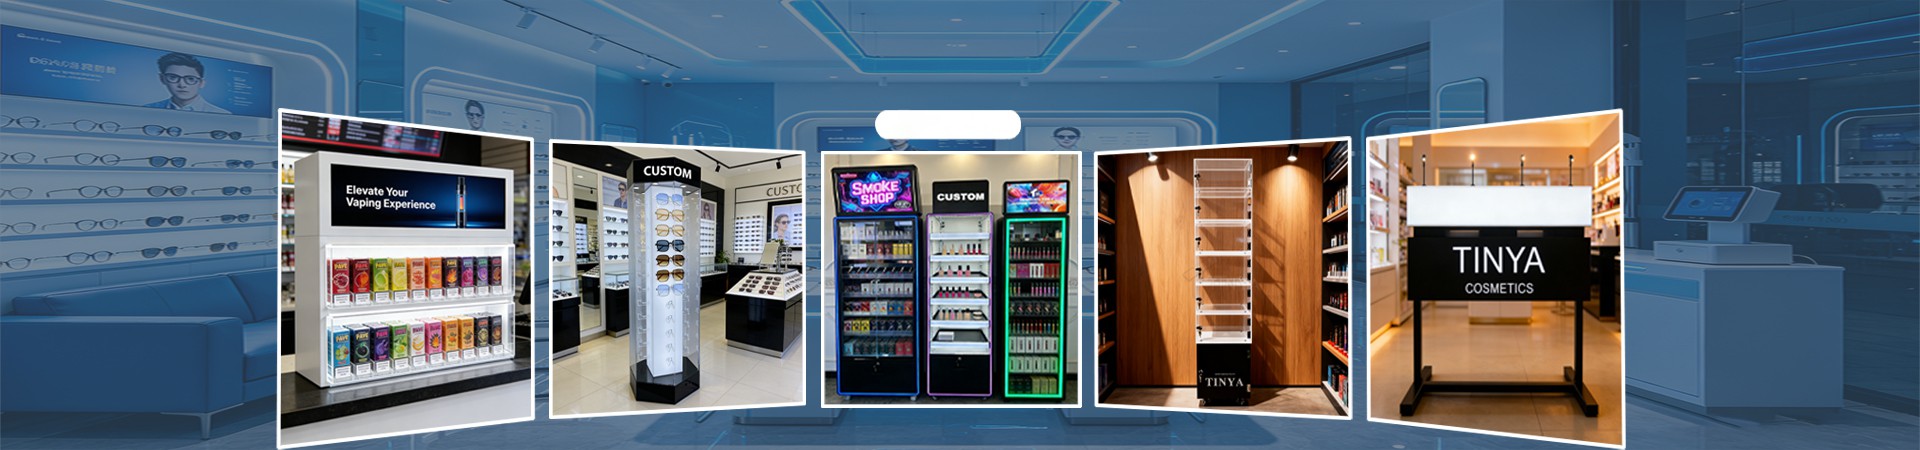
Popular Applications for Acrylic Box Products
Today, acrylic box products are used across many industries.

Vape Display Acrylic Box
Many vape brands use illuminated acrylic box displays for retail merchandising.

Cosmetic Acrylic Box
Luxury cosmetic brands use transparent acrylic box displays for lipsticks, skincare, and perfumes.

Electronics Acrylic Box
An acrylic box can protect electronics from dust and moisture.

Donation Acrylic Box
Clear acrylic donation boxes are widely used in stores and public spaces.

LED Acrylic Box
LED-lit acrylic box displays attract more customer attention in retail environments.
How to Maintain an Acrylic Box
Proper maintenance helps your acrylic box remain clear and attractive.
Tips include:
- Use microfiber cloths
- Avoid alcohol cleaners
- Prevent scratching
- Store away from high heat
A clean acrylic box always looks more professional.
Is DIY Acrylic Box Fabrication Worth It?
For hobbyists and small projects, a diy acrylic box can be rewarding.
However, for commercial use, professional production usually offers:
- Better waterproof performance
- Cleaner joints
- Faster production
- Custom branding
- Higher durability
If your project requires bulk quantities or retail-grade quality, factory manufacturing is often more efficient than trying to build plexiglass box structures manually.
Custom Acrylic Box Manufacturing Services
If you do not want to spend time learning how to make an acrylic box, professional manufacturers can help create fully customized solutions.
Custom acrylic box services may include:
1
2
3
4
5
6
7
8
9
Professional acrylic box manufacturers can also help optimize designs for shipping and retail presentation.
Looking for custom acrylic box production for vape displays, cosmetics, electronics, or retail merchandising? Send us your design or idea - we support low MOQ customization and fast global delivery.
Frequently Asked Questions
How do you waterproof an acrylic box?
To waterproof an acrylic box, apply silicone sealant along all internal seams after bonding the acrylic panels.
What glue is best for an acrylic box?
Acrylic cement or UV adhesive is best because it creates transparent and strong joints.
Is acrylic better than glass for waterproof boxes?
Yes. Acrylic is lighter, safer, and easier to fabricate into a waterproof acrylic box.
Can beginners make an acrylic box?
Yes. Many beginners successfully complete a plexiglass box diy project using simple tools.
What is the difference between plexiglass and acrylic?
They are essentially the same material. Perspex and plexiglass are brand names commonly used for acrylic sheets.
How long does acrylic adhesive take to cure?
Most acrylic adhesives require 24–48 hours for full curing.
Learning how to make an acrylic box can be a useful skill for DIY enthusiasts, retailers, and display designers. Whether you are creating a simple storage container, a retail showcase, or a waterproof enclosure, proper material selection and assembly techniques are essential.
From how to make a plexiglass box to advanced waterproof sealing methods, every step affects the final quality of the acrylic box.
Although a diy acrylic box project can work well for personal use, commercial projects often benefit from professional manufacturing services that offer precision cutting, seamless bonding, and long-lasting waterproof performance.
As acrylic fabrication technology continues to improve, the demand for custom acrylic box solutions in retail, cosmetics, electronics, and vape displays will continue growing worldwide.
For more information on customization, please contact us immediately!